SSSICK/BUOY
Introduction
Buoy is an all-in-one data-logging and tuning tool for the SSSMCK (SSSQUID MAF CONVERSION KIT). It is in beta stages and as such may have bugs. Please contact us with any bugs you may encounter.
From Buoy you can monitor live data (airflow rate), log it to a file, replay old logs, update firmware, and program the SSSMCK for different MAF, MAP, or TPS sensors, and different vehicle's.
This tool was developed in and for Linux first, however it's obvious that most users will have Windows, so development has shifted more toward that recently. At the moment the Linux flavors still run better. There is no version for Mac OSX and we do not have any plans to ever develop an app for it.
Expect new software to be released regularly. We have not implemented an auto-update function yet. Please bookmark this page to get quick access to the latest software.
An Android version will eventually be available for Bluetooth-enabled hardware (revisions R019 and newer). We have no plans to ever develop an iOS app because it's garbage.
Starting with second-generation R019 hardware we are no longer including flashing hardware. The firmware is in its final, or near-final form, and should not require updating to get everything you need out of it. All customization features have been coded in, and the unit can be FULLY TUNED OVER BLUETOOTH. Using software version 0.19.12 and newer you can access and tune all of the features on your R019 hardware using FW versions 0191426 and newer (you can check your FW version from within Buoy, see below). We will also be releasing firmware for R018 hardware to gain access to the latest features. Please contact us for R018 firmware downloads.
If you purchased your R019 HW prior to May 2022 (known as first-generation R019), you will want to update to the latest firmware (please contact us for the latest FW). There are VERY MINOR differences in circuit design and hardware between first- and second-gen R019 hardware, so the firmware is interchangeable. First-gen R019 hardware is versioned between R01901 through R01905; second-gen R019 hardware is versioned R01906 and higher.
Download
All you will have to do is extract the "Buoy" folder from the .zip (Windows) or .tar (Linux) file and double-click "Buoy.exe" for Windows, or for Linux, double-click the "Buoy.sh" and select "run".
Linux users, if your Buoy.sh file will not run, you may need to set the correct executable permissions for the file. This can be done by opening a terminal window, navigating to the folder that contains "Buoy.sh", and running the following code:
$ chmod +x Buoy.sh
Now try running Buoy.sh again. Simple as that!
Hardware R019 and Newer
Hardware R019 contains major updates that require the newest firmware. The new firmware contains major updates that can only be taken advantage of using the newest PC software. While you can use Buoy 0.18.xx for the most basic logging functions, you will need to use Buoy 0.19.xx to take full advantage of all the new features.
In order to make sure of all the new features properly, the latest software contains MAJOR changes and is even written in a different top-level programming language.
Latest Stable Version: 0.19.1767 (Released 28 June 2022)
Hardware R013-R018
Latest Stable Version: 0.18.09 (Released 05 November 2021)
- Windows
- Linux
"JRE pre-compiled" vs "JRE required": JRE stands for Java Runtime Environment. It is what allows you to run Java applications. This is an extremely common thing to have installed. Many applications that require it will install it for you, or may point you to the right download page to install it yourself. Similarly, many operating systems (mostly the major Linux flavors) will come with JRE pre-installed.
We offer two versions for download, JRE required and JRE pre-compiled. "JRE required" offer a vastly smaller download size for people who already have the JRE installed. "JRE pre-compiled" will download Buoy with JRE included within the application itself, but will therefore be a much larger file (about 370 MB versus the much smaller 40 MB "JRE required" download).
If you are unsure what JRE is, if you have it, or what you should do -- the best idea would be to download the JRE pre-compiled version and not worry about it.
Previous versions available by request, though you should most likely be using the latest version!
SSSMCK firmware versions before R01807 may not plot data at the correct rate for the Buoy software versions 0.18.07 and newer, please contact us for the latest firmware!
Hardware R011 and Older
Due to the complications of commandline interaction with the older units, we've taken down a lot of the instructions. However, we are happy to help anyone that needs help with their R011 or older hardware, just email us! [email protected]
Installation
This program is designed to be portable -- there is no installation necessary. Simply extract the compressed folder contents to its own directory and run "Buoy.sh" (Linux) or "Buoy.exe" (Windows).
For the 32-bit Windows version of Buoy, the necessary JRE (Java Runtime Environment) is not pre-packaged. You may need to install the JRE if you haven't already: Java JRE. The JRE is pre-packaged on a 64-bit version (what most everyone will be using). Unless you are running an older 32-bit version of Windows (like 32-bit XP), it is recommended to use the 64-bit version.
For Linux users, Java is required to run but is not prepackaged. Many flavors of Linux will come with the necessary runtime environments pre-installed, but if you're not sure you can check with your system's package manager.
Drivers
Most flavors of Linux will come pre-installed with the necessary drivers.
For Windows, you may need to install the standard FTDI D2XX drivers available at the following link: FTDI D2XX Download Page
Interface
- Main
- Setup port, flash firmware, and view diagnostic information.
- Live Dash
- View and log live airflow data.
- Log Replay
- View previously recorded logs with many ways to manipulate and filter the data.
Usage
Connecting
R019
Starting with R019 hardware the SSSMCK is not bluetooth enabled. While it no longer offers the option for flashing firmware by the user, it can be fully tuned wirelessly without the need to open it or plug it in to a USB cable. If you have an older unit or firmware, we are happy to reflash any unit to the latest firmware at no charge, please email us to get setup!
Bluetooth
Windows 10:
From the Bluetooth main menu, select "Add Bluetooth or other device"

It will ask you to select "Bluetooth device", at which point your computer will scan for the SSSMCK.
Click on "SSSMCK" and it will prompt you for a password. Enter "1234" and click "Connect".

Troubleshooting
Sometimes Windows 10 will not automatically allocate a COM port for Bluetooth devices. You can fix this by following these instructions:
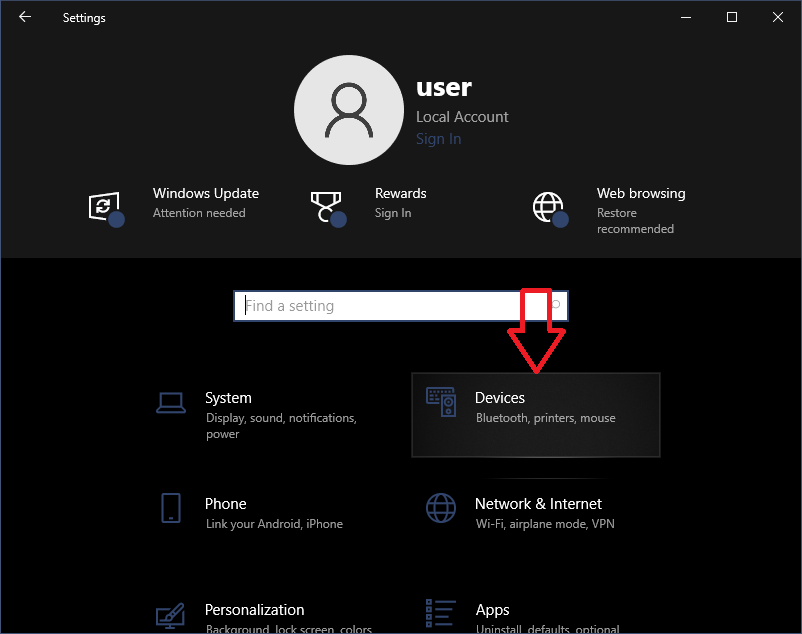
- Open Windows main settings by opening the "Start" menu and clicking on the "Settings" icon or by typing "Settings" and opening the "Settings" app.
- Select "Devices" from the main menu presented.
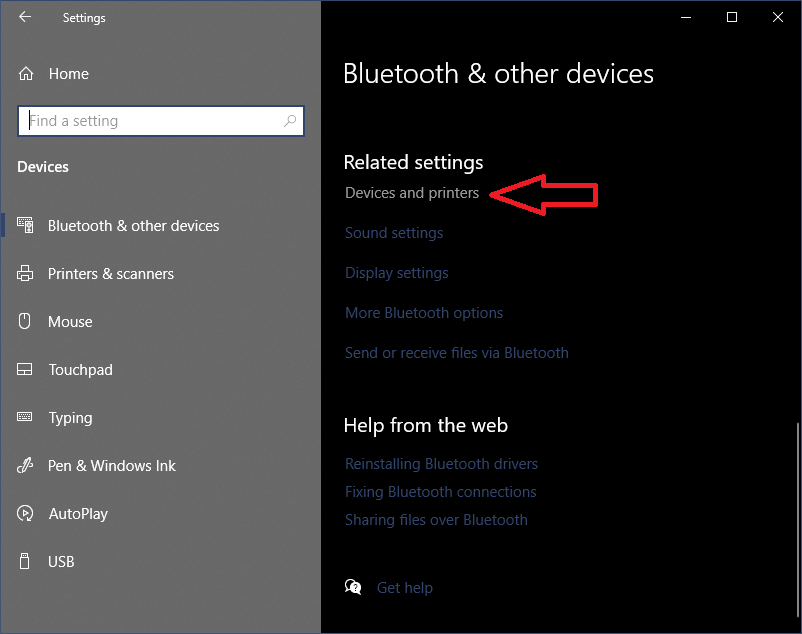
- Under "Related Settings", which you can find either on the right-side or by scrolling down, click on "Devices and printers".
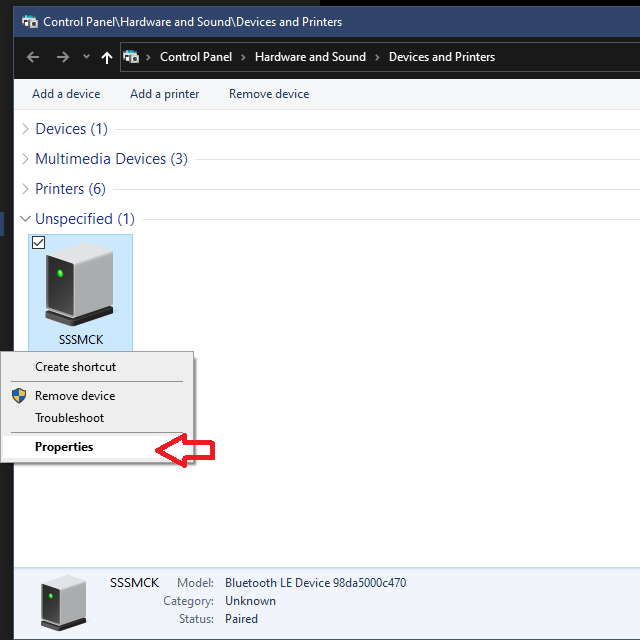
- Find "SSSMCK" under the "Unspecified" section. Right-click it and select "Properties".
- A new window will pop-up. Select the tab titled "Services". Then make sure the box is checked that says "Serial port (SPP)".
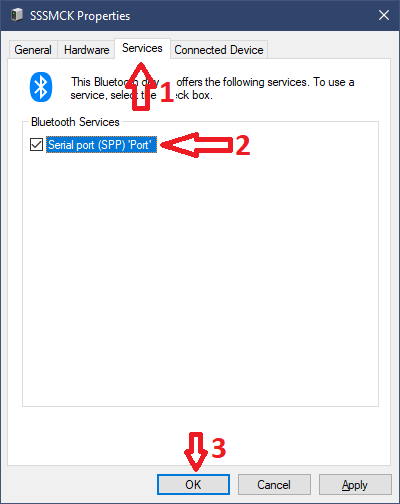
- Select "OK". The SSSMCK will now be able to communicate normally! After you complete this task, you can find the COM port # by returning to the "Services" tab of the "Properties" window. You can see in this screenshot that the SSSMCK is bound to COM port 4 (COM4):


USB
With R019, the connection is now 100% wireless. Please see the bluetooth setup section for more information.
R014-R018
With the top cover removed, you will need to find a 6-pin header. This is where the logging/flashing module will be plugged.

Plug in your logging/flashing module. It can only be inserted in one direction.

Connect the USB cable to your computer. If you are logging, please skip the next step.
ONLY if you are flashing the module!: it is recommended to use the USB power. You can do this by moving the "REG-USB" jumper from the "REG" side to the "USB" side as pictured below:

Once you finish flashing, please make sure to move this jumper back to the "REG" side before continuing use on your vehicle.
Software
On the "Main" tab you will find the connection and flashing options.

First you will need to select the correct port. Click on "Select Port" and you will be presented with a list of available ports.
If you are unsure of which port the SSSMCK is connected through, you can simply disconnect the device and reconnect it to see which port is added and removed. The list automatically updates.

Once the port is selected, click "Connect". It will take 2 seconds to connect, do not repeatedly click the "Connect" button during this time period. The SSSMCK should connect and automatically start sending airflow data. If data is not graphed on the "Live Dash" page, you can try disconnecting and reconnecting.

Data-logging
Once connected the SSSMCK should automatically begin transmitting airflow data to the program. This is displayed in kilograms per hour (Kg/Hr).

On this page you can set an output file. Use the file extension ".csv" for logs (this file extension should automatically be added, but there is a bug in Windows where if your file path has one or more periods it may not be automatically added).
Once you have set the output file, you may begin logging by selecting "Start Recording". Once you are finished recording, select "Stop Recording" or simply close the program.
There are many ways to display the data, as a line (recommended and default), as dots, or as bars. The rest of the options are primarily for further diagnostics when necessary, but should not be needed or used by most users.
Log Replay
If you would like to view previously recorded logs, you can open them a number of ways. They are output as simple CSV files (Comma Separated Values). These can be read by programs such as OpenOffice/LibreOffice Calc, Microsoft Excel, or within Buoy.
To open a previously recorded log, select "Open CSV File" and browse to the folder where the log was recorded. Select and open the log to populate the graph.

You can manipulate the data, apply filters, change how it is displayed, and more by using the "Graph Options" and "Data Manipulation" sections.
Flashing
In hardware version R019xx and newer, flashing is no longer necessary to change various settings. Instead you can program your unit for various sensors and adjust various tuning parameters through Buoy and without the need for a hardware flashing module.
If you are using R018 and older, please follow the below instructions:
On the "Main" page, make sure you have the proper port selected and are connected to the SSSMCK. Under "Firmware Control" click on "Select Firmware" to be presented with a file explorer. Navigate to the firmware (file extension ".mckf") you wish to flash to the device and select it.

Once you have chosen the firmware, the button underneath it will change to "Flash Firmware". Click this button to flash the firmware. A success or failure message will be displayed in the console log.
Configuration
You can configure most of the program's settings, such as the theme and interface scaling, by clicking on the settings icon in the upper-right side of the application.
It's recommended to leave the connection settings alone, they should be configured correctly by default. The interface scaling and themes are easily configurable here.
Firmware
".MCKF" files contain the firmware for your specific hardware version. Since we are constantly releasing new versions, please contact us with your required MAF and VAM combination and your hardware version, we will reply with a download of the latest available software.
All units ship with the proper and latest available firmware for your hardware and are pre-programmed for your selected MAF and VAM, so there is no need to flash a new unit unless you are changing vehicles/tunes/MAFs, there are fixes, or the latest software requires it.
As of firmware 0190923 and newer, flashing to a new MAF/MAP/TPS/VAM can be done independently and wirelessly through Buoy and without the need to flash the unit with the hardware flashing module.
Tuning
Tuning from within Buoy is currently in alpha-stages, it will be available publicly soon!
Parameters
Input Sensor
There are many different input sensors to choose from: Mass AirFlow sensors, Throttle Position sensors, and Manifold Air Pressure sensors. While each unit is shipped pre-programmed for the sensor you chose at checkout, you can always reprogram it for a new sensor later.
You can use one of the available MAF sensors freely without the need for a specific ECU tune. However some sensors, such as TPS and MAP, require you to have a specific ECU tune in order to run properly.
Output VAM
This is the sensor that your ECU is tuned for. This is almost certainly the stock VAM that your vehicle was equipped with, unless it was changed and your ECU was retuned for another sensor at some point.
Averaging
Enable to allow the SSSMCK to perform software averaging of signal processing. This is enabled by default.
We recommend a setting of somewhere between 20 and 40. A larger value means slower reaction, but perhaps smoother operation. A smaller value means sharper response, but an overly small value will provide the ECU with too much noise and may cause rocky operation.
- Recommended values based on input sensor used:
- MAF: 20-40
- TPS: 5-15
- MAP: 25-50
Manual Correction
Enable this to allow the making of manual corrections to output. This scalar is part of a final output equation. Adjusting this directly affects the calculated airflow. (E.G. 100 kg/hr will be converted to 105 kg/hr with a correction scalar of 1.05)
Dynamic Correction
Leave this disabled unless you are having issues with fuel ratios that cannot be fixed with minor manual corrections.
Enable this to allow the SSSMCK to automatically make corrections to output based on discrepancies. This scalar cannot be set manually as it is dynamic and the SSSMCK will automatically learn different values for different airflow ranges.
This scalar directly affects output signal directly and not airflow values. This is used to adjust for voltage inputs that are slightly out of spec.
- Correction Limits
- The MINIMUM and MAXIMUM scalar values for how far the SSSMCK can go to make automatic adjustments.
- We recommend setting these limits to no less than 0.90 and no more than 1.10.
Custom LED Color
With our newer firmwares the LED operation has changed. You can now set your own custom LED color for normal operation. The default normal operation LED color is green. Resetting the unit to default values will also reset your custom LED color to green.
This is expressed as an 8-bit integer value (between 0 and 255). A higher integer means a higher saturation of that color. Setting red, green, and blue to 255 will produce a white light. Setting all to 0 will produce no light. Setting red to 255, green to 0, and blue to 255 will produce a purple light.
Timer Periods
Adjust these to change how often the SSSMCK will perform certain activies and checks.
Timer Period 1
Timer Period 1 handles functions such as dynamic correction updates and manual correction updates. Lowering this will increase how often these corrections are made and updated. Raising this will slow down corrections.
Recommended values are between 40 and 60.
Timer Period 2
Timer Period 2 handles functions such as error checking. Lowering this will increase how often error checks are made. Raising this will slow down error checking. Recommended values are between 80 and 180.
M40/2 Mode
The M40/2 VAM has three outputs, one for IAT and two for airflow. Therefore an additional wire is added to units destined for an M40 or M42 engine. M42 mode enables the output of all three of these signals to the ECU.
- Operation Mode
- Default: The standard operation mode, what most people will use.
- Sweep: Used if the "default" option is providing inconsistent results.
- Inverse: We've found that the E36 M42 models prefer this setting.
- Threshold kg/hr
- The airflow rate at which M42 mode is active, Typically this is set to around 10-30.
- Output rate
- A scalar for the additional output signal. This is used to adjust for any possible discrepancies.
Reset to default values
If you ever have trouble, you can easily reset everything to default values from within Buoy. Instructions will be available with the release of the next version of Buoy.