SSSICK/BUOY/Connection/Ubuntu: Difference between revisions
m (4 revisions imported) |
|||
| (2 intermediate revisions by the same user not shown) | |||
| Line 2: | Line 2: | ||
=GUI= | =GUI= | ||
There may be some command-line necessary depending on a number of factors. | |||
Enter the Bluetooth settings by clicking on the control panel in the upper-right side of the screen, opening the Bluetooth menu, and clicking "Bluetooth Settings". | # Enter the Bluetooth settings by clicking on the control panel in the upper-right side of the screen, opening the Bluetooth menu, and clicking "Bluetooth Settings". | ||
#* [[File:Enter bluetooth settings.png]] | |||
[[File:Enter bluetooth settings.png]] | # Your computer should find the SSSMCK automatically. Click on it to connect. | ||
#* [[File:Connect to bt.png]] | |||
Your computer should find the SSSMCK automatically. Click on it to connect. | # Enter the PIN, which is 1234 by default. | ||
#* [[File:Enter pin gui.png]] | |||
[[File:Connect to bt.png]] | # For many people this will be all you need to do! However... | ||
## Depending on which Bluetooth adapter you are using, it may not automatically set the connection to the correct type. If the connection toggle will not toggle "on", you may need to take one further step. | |||
Enter the PIN, which is 1234 by default. | # Copy the devices Bluetooth address: | ||
#* [[File:Copy bt address.png]] | |||
[[File:Enter pin gui.png]] | # Then run the following command from a terminal window: | ||
#* <code>sudo rfcomm connect [port #] [BT address]</code>. | |||
For many people this will be all you need to do! However... | ## This will make a temporary connection. If you wish to make the connection permanent, you can run | ||
##* <code>sudo rfcomm bind [port #] [BT address]</code>. | |||
Depending on which Bluetooth adapter you are using, it may not automatically set the connection to the correct type. If the connection toggle will not toggle "on", you may need to take one further step. | # The port number can be any number that is not in use between 0-99. Run the following command to print out which ports are currently in use: | ||
#*<code>ls /dev/rfcomm*</code> | |||
Copy the devices Bluetooth address: | #* [[File:Rfcomm connect ubu.png]] | ||
# In this case, you will see it displayed as "/dev/rfcomm[port #]" | |||
[[File:Copy bt address.png]] | #* [[File:Rfcomm in devices ubu.png]] | ||
Then run the following command from a terminal window: <code>sudo rfcomm connect [port #] [BT address]</code> | |||
The port number can be any number that is not in use between 0-99. Run the following command to print out which ports are currently in use: <code>ls /dev/rfcomm*</code> | |||
[[File:Rfcomm connect ubu.png]] | |||
In this case, you will see it displayed as "/dev/rfcomm[port #]" | |||
[[File:Rfcomm in devices ubu.png]] | |||
===Command Line=== | ===Command Line=== | ||
This should work for most major Debian/Ubuntu-based distros. This is performed in a clean installation of Linux Mint, which is based on (but better than) Ubuntu. Ubuntu is based on Debian and shares many commonalities. | This should work for most major Debian/Ubuntu-based distros. This is performed in a clean installation of Linux Mint, which is based on (but better than) Ubuntu. Ubuntu is based on Debian and shares many commonalities. | ||
Start by entering the bluetoothctl terminal by opening a terminal and typing | # Start by entering the bluetoothctl terminal by opening a terminal and typing | ||
<code>bluetoothectl</code> | #* <code>bluetoothectl</code> | ||
# Once entered, you will start a scan of nearby devices by running: | |||
Once entered, you will start a scan of nearby devices by running: | #* <code>scan on</code> | ||
<code>scan on</code> | #* [[File:Bluetooth scan.png]] | ||
## Allow the scan to run for a few seconds. A number of devices will be detected. | |||
[[File:Bluetooth scan.png]] | # After a few seconds, run <code>scan off</code> to stop scanning. | ||
# To show devices that were found, run | |||
Allow the scan to run for a few seconds. A number of devices will be detected. After a few seconds, run <code>scan off</code> to stop scanning. | #* <code>devices</code> | ||
# Find the "SSSMCK", select and copy the devices BT address (in this case 98:DA:50:00:BF:05). You will need this address for a few further steps. Paste it into an empty document if you need to. | |||
To show devices that were found, run <code>devices</code> | #* [[File:Scan on off devices.png]] | ||
# Now we will trust and pair the device so that we do not need to enter the PIN code each time. Do this by running | |||
Find the "SSSMCK", select and copy the devices BT address (in this case 98:DA:50:00:BF:05). You will need this address for a few further steps. Paste it into an empty document if you need to. | #* <code>trust [BT address]</code> | ||
# Then we will pair the device by running | |||
[[File:Scan on off devices.png]] | #* <code>pair [BT address]</code> | ||
# At this point you will be asked for the PIN. By default this is 1234. | |||
Now we will trust and pair the device so that we do not need to enter the PIN code each time. Do this by running <code>trust [BT address]</code> | #* [[File:Pair and connect.png]] | ||
Then we will pair the device by running <code>pair [BT address]</code> | |||
At this point you will be asked for the PIN. By default this is 1234. | |||
[[File:Pair and connect.png]] | |||
If Buoy does not recognize the device you may need to create a com port. We do this by using "rfcomm". | |||
[[File:Rfcomm in buoy.png]] | # Run | ||
#* <code>sudo rfcomm connect [device #] [BT address]</code> | |||
# In this example we assign it to #5 -- you will want to use any available rfcomm devices. This is likely any number between 0-99 unless you have previously assigned ports. | |||
## You can view which ports are in use by running <code>ls /dev/rfcomm*</code>. Any devices that are returned are currently in-use and cannot be assigned. | |||
#* [[File:Rfcomm connect.png]] | |||
# We can make this connection permanent by running | |||
## <code>sudo rfcomm bind [device #] [BT address]</code> and it will automatically connect and bind when detected. | |||
# We can now see the device listed in Buoy. | |||
#* [[File:Rfcomm in buoy.png]] | |||
===Troubleshooting=== | ===Troubleshooting=== | ||
Latest revision as of 18:46, 31 May 2023
Ubuntu requires at least some command line work because the default bluetooth manager is horrendously bad. Please, if you can, do not use Ubuntu -- it's invasive (tracks your usage) and has one of the worst UI of any Linux Distro aside from Pop OS (which has the absolute worst).
GUI
There may be some command-line necessary depending on a number of factors.
- Enter the Bluetooth settings by clicking on the control panel in the upper-right side of the screen, opening the Bluetooth menu, and clicking "Bluetooth Settings".
- Your computer should find the SSSMCK automatically. Click on it to connect.
- Enter the PIN, which is 1234 by default.
- For many people this will be all you need to do! However...
- Depending on which Bluetooth adapter you are using, it may not automatically set the connection to the correct type. If the connection toggle will not toggle "on", you may need to take one further step.
- Copy the devices Bluetooth address:
- Then run the following command from a terminal window:
sudo rfcomm connect [port #] [BT address].
- This will make a temporary connection. If you wish to make the connection permanent, you can run
sudo rfcomm bind [port #] [BT address].
- The port number can be any number that is not in use between 0-99. Run the following command to print out which ports are currently in use:
ls /dev/rfcomm*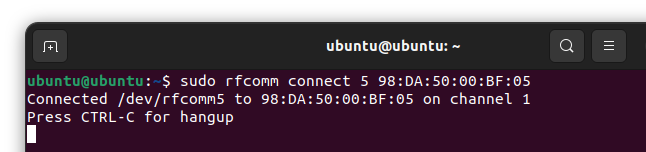
- In this case, you will see it displayed as "/dev/rfcomm[port #]"


Command Line
This should work for most major Debian/Ubuntu-based distros. This is performed in a clean installation of Linux Mint, which is based on (but better than) Ubuntu. Ubuntu is based on Debian and shares many commonalities.
- Start by entering the bluetoothctl terminal by opening a terminal and typing
bluetoothectl
- Once entered, you will start a scan of nearby devices by running:
scan on
- Allow the scan to run for a few seconds. A number of devices will be detected.
- After a few seconds, run
scan offto stop scanning. - To show devices that were found, run
devices
- Find the "SSSMCK", select and copy the devices BT address (in this case 98:DA:50:00:BF:05). You will need this address for a few further steps. Paste it into an empty document if you need to.
- Now we will trust and pair the device so that we do not need to enter the PIN code each time. Do this by running
trust [BT address]
- Then we will pair the device by running
pair [BT address]
- At this point you will be asked for the PIN. By default this is 1234.


If Buoy does not recognize the device you may need to create a com port. We do this by using "rfcomm".
- Run
sudo rfcomm connect [device #] [BT address]
- In this example we assign it to #5 -- you will want to use any available rfcomm devices. This is likely any number between 0-99 unless you have previously assigned ports.
- You can view which ports are in use by running
ls /dev/rfcomm*. Any devices that are returned are currently in-use and cannot be assigned.
- You can view which ports are in use by running
- We can make this connection permanent by running
sudo rfcomm bind [device #] [BT address]and it will automatically connect and bind when detected.
- We can now see the device listed in Buoy.


Troubleshooting
If you are unable to communicate with the kit or you are getting this error when trying to connect:

It means that you do not have appropriate permissions to open the port. You can either run the app as root sudo ./Buoy.sh or you can fix this by continuing to read below:
While this is shown in Linux Mint, this is a nearly universal configuration for most every Debian-based Linux distro (as well as a few others).
First, we want to see what group the device is being assigned. By default this should be either the "tty" group or the "dialout" group. However, if you have very strict security settings, your computer may assign this device to the group "root". In this case, you will only be able to access the device if you belong to the root group. We can find out what group the device is assigned by running ls -al /dev/ttyUSB* (or whatever device identifier your SSSMCK is being assigned, this can by ttyACM[#], ttyrfcomm[#], or similar).
![]()
We can see here that the device is being assigned to the "root" group. If it belongs to another group, such as "tty" or "dialout", we just need to add our user to that group and you can skip modifying any device rules. If it belongs to root, we need to take a few extra steps.
First we need to find out what groups our user belongs to. Do this by running groups
Then we need to find out which groups are available by running cat /etc/group.

Here we see that the group "tty" is available. This is the best choice to use. If it is not available, you can use the group "dialout" instead. Since this user does not belong to this group, we need to add this user to the group. Do this by running sudo usermod -a -G tty [your username]

Finally we need to modify the rules file that assigns the SSSMCK to a group. Do this by running sudo [your favorite text editor] /lib/udev/60-serial.rules. In this case we will edit the file with "nano", but you can use vim or xed or whatever you have installed.
![]()
We will look for a line that starts with SUBSYSTEMS=="usb and append the following text: , GROUP="tty". Please note that the COMMA is VERY IMPORTANT! Now save the file (with nano use "Ctrl + x" and then confirm the save).

Now the next time that we connect to the SSSMCK we will see that it has been assigned to the "tty" group:
