SSSICK/BUOY
Introduction
Buoy is an all-in-one data-logging and tuning tool for the SSSMCK (SSSQUID MAF CONVERSION KIT).
From Buoy you can monitor live data (airflow rate and intake air temperature), log these parameters to a file, and tune the SSSMCK for different input and output sensors.
Expect new software to be released regularly. You can check for and download any updates from within Buoy, or by checking this page and downloading it directly.
This tool was developed in and for Linux first, however Windows versions are available as well. We have no plans to develop an OSX version.
An Android version will shortly be available for the Bluetooth-enabled hardware (revisions R019 and newer). We have no plans to develop an iOS app.
Please contact us with any bugs you may encounter.
Installation
All you will have to do is extract the files from the .zip (Windows) or .tar.gz (Linux) file and double-click "Buoy.exe" for Windows, or for Linux, double-click the "Buoy.sh" and select "run as program". If you are using the user-unfriendly Ubuntu you will need to right-click and select "run as program".

Linux users, if your Buoy.sh file will not run, you may need to set the correct executable permissions for the file. This can be done by opening a terminal window, navigating to the folder that contains "Buoy.sh", and running the following command:
chmod +x Buoy.sh
Now try running Buoy.sh again. Simple as that!
Download
Hardware R016 and Newer
This software version represents a rather large change to how most things work within Buoy in comparison with the last public release (0.18). It is compatible with all hardware R016 and newer. We will be adding further backwards compatibility in the future!
Windows and Linux versions are now matching. In Linux there are no longer any drivers to install.
Latest Stable Version: 0.20.0305 (Released: 2022/10/28)
- LINUX 64-bit
- WINDOWS 64-bit
If you have a system that is NOT based on AMD/Intel 64-bit processors, we can compile the application to work with other architectures (such as ARM). Since this is so rare, we don't compile every single version for these particular systems. Please contact us for downloads! However, for the 99% of you who are using Intel- or AMD-based 64-bit processors, the above downloads will work perfect!
Hardware R013-R015
Latest Stable Version: 0.18.09 (Released: 2021/11/05)
- Windows
- Linux
"JRE pre-compiled" vs "JRE required": JRE stands for Java Runtime Environment. It is what allows you to run Java applications. This is an extremely common thing to have installed. Many applications that require it will install it for you, or may point you to the right download page to install it yourself. Similarly, many operating systems (mostly the major Linux flavors) will come with JRE pre-installed.
We offer two versions for download, JRE required and JRE pre-compiled. "JRE required" offer a vastly smaller download size for people who already have the JRE installed. "JRE pre-compiled" will download Buoy with JRE included within the application itself, but will therefore be a much larger file (about 200 MB compared to the much smaller 40 MB "JRE required" download).
If you are unsure what JRE is, if you have it, or what you should do -- the best idea would be to download the JRE pre-compiled version and not worry about it.
Previous versions available by request, though you should most likely be using the latest version!
SSSMCK firmware versions before R01807 may not plot data at the correct rate for the Buoy software versions 0.18.07 and newer, please contact us for the latest firmware!
Hardware R011 and Older
Due to the complications of commandline interaction with the older units, we've taken down a lot of the instructions. However, we are happy to help anyone that needs help with their R011 or older hardware, just email us! [email protected]
We can provide the latest firmware rewritten for the older hardware versions, which will make it compatible with the latest versions of Buoy.
Old Versions
While we recommend using the latest Buoy version available, we can provide you with older versions upon request. [email protected]
Installation
This program is designed to be portable -- there is no installation necessary. Simply extract the compressed folder contents to its own directory and run "Buoy.sh" (Linux) or "Buoy.exe" (Windows).
For the 32-bit Windows version of Buoy, the necessary JRE (Java Runtime Environment) is not pre-packaged. You may need to install the JRE if you haven't already: Java JRE. The JRE is pre-packaged on a 64-bit version (what most everyone will be using). Unless you are running an older 32-bit version of Windows (like 32-bit XP), it is recommended to use the 64-bit version.
For Linux users, Java is required to run but is not prepackaged. Many flavors of Linux will come with the necessary runtime environments pre-installed, but if you're not sure you can check with your system's package manager.
Drivers
All drivers are now pre-packaged. There should not be any need to install additional drivers.
Usage
Older software:
Firmware
As of firmware 0190923 and newer, flashing to a new MAF/MAP/TPS/VAM can be done independently and wirelessly through Buoy and without the need to flash the unit with the hardware flashing module. Newer hardware versions do not include a firmware flashing dongle and are not user-flashable. We are happy to flash your SSSMCK to the latest firmware at NO COST, please contact us to get setup!
For older hardware we wanted to include the ability to update the firmware as it was continually developed in order to support new features. Therefore a flashing dongle was included. While it's not necessary to run the latest firmware, you may notice improvements by using it. If you'd like a copy of the latest firmware, please email us with your order number or hardware version and we'll get you setup as soon as possible. If you are on older hardware (specifically R018 or older) then updating the latest FW is highly recommended and it will allow you to tune within Buoy. Please contact us for downloads [email protected]!
".MCKF" files contain the firmware for your specific hardware version. Since we are constantly releasing new versions, please contact us with your required MAF and VAM combination and your hardware version, we will reply with a download of the latest available software.
All units ship with the proper and latest available firmware for your hardware and are pre-programmed for your selected MAF and VAM, so there is no need to flash a new unit unless you need the newest features, there are fixes, or the latest Buoy software requires it.
As of September 13th, 2022 a new firmware version is available with vastly improved filtering and overall operation. We have produced retro firmware for hardware R013 through R019. All hardware versions R020 already contain the latest firmware. If you have older hardware and want the latest features, please contact us for firmware downloads!
Tuning
Read more on the Tuning page!
Connection
Windows 10
From the Bluetooth main menu, select "Add Bluetooth or other device"

It will ask you to select "Bluetooth device", at which point your computer will scan for the SSSMCK.
Click on "SSSMCK" and it will prompt you for a password. Enter "1234" and click "Connect".

Troubleshooting
Sometimes Windows 10 will not automatically allocate a COM port for Bluetooth devices. You can fix this by following these instructions:
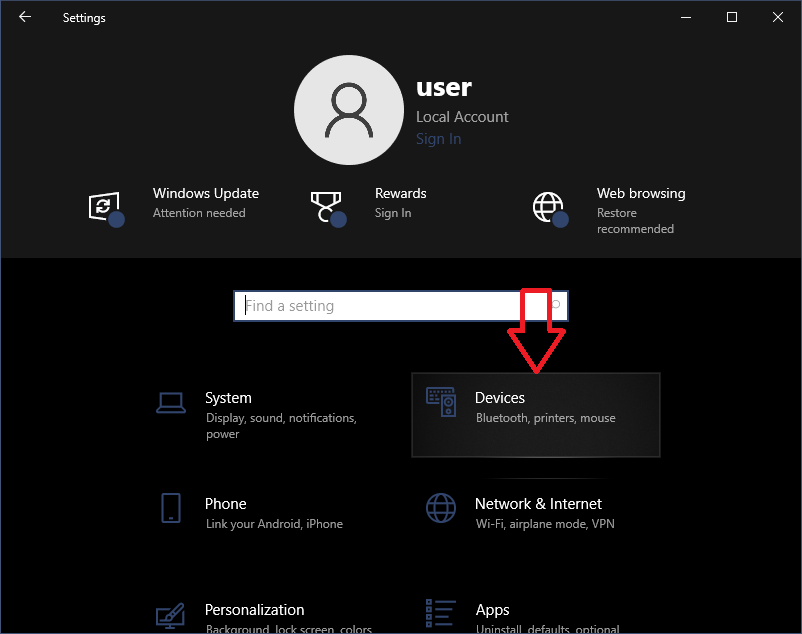
- Open Windows main settings by opening the "Start" menu and clicking on the "Settings" icon or by typing "Settings" and opening the "Settings" app.
- Select "Devices" from the main menu presented.
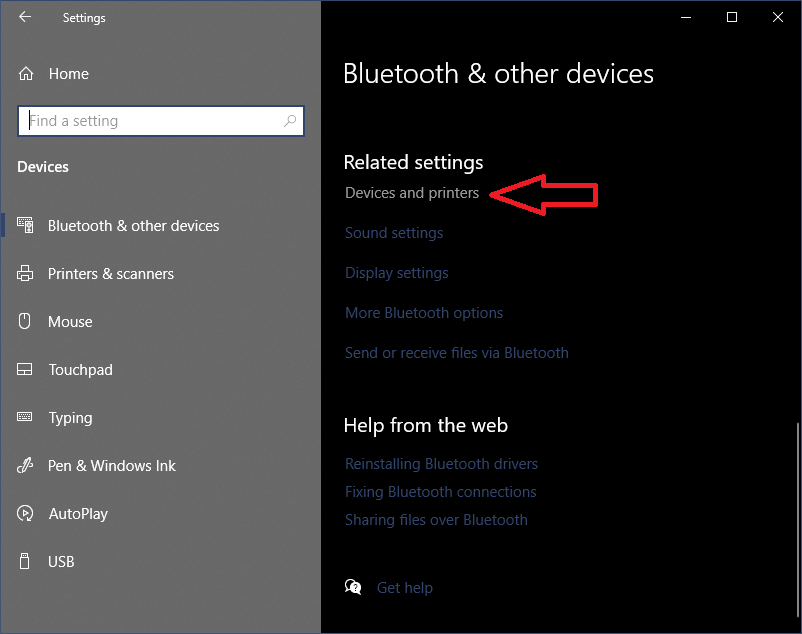
- Under "Related Settings", which you can find either on the right-side or by scrolling down, click on "Devices and printers".
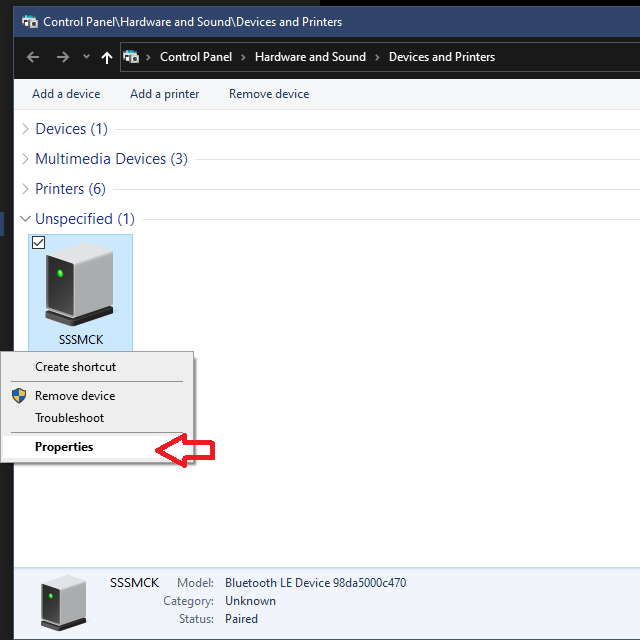
- Find "SSSMCK" under the "Unspecified" section. Right-click it and select "Properties".
- A new window will pop-up. Select the tab titled "Services". Then make sure the box is checked that says "Serial port (SPP)".
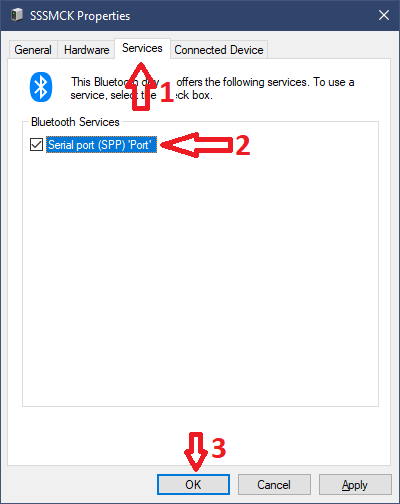
- Select "OK". The SSSMCK will now be able to communicate normally! After you complete this task, you can find the COM port # by returning to the "Services" tab of the "Properties" window. You can see in this screenshot that the SSSMCK is bound to COM port 4 (COM4):


Linux
There are many, many different ways to connect to Bluetooth devices in the many, many different distros available. Below we will go over some of the more popular methods and distros.
GUI
This will demonstrate how to connect with Ubuntu -- one of the more popular distributions.
Enter the Bluetooth settings by clicking on the control panel in the upper-right side of the screen, opening the Bluetooth menu, and clicking "Bluetooth Settings".

Your computer should find the SSSMCK automatically. Click on it to connect.

Enter the PIN, which is 1234 by default.

For many people this will be all you need to do! However...
Depending on which Bluetooth adapter you are using, it may not automatically set the connection to the correct type. If the connection toggle will not toggle "on", you may need to take one further step.
Copy the devices Bluetooth address:

Then run the following command from a terminal window: sudo rfcomm connect [port #] [BT address]
The port number can be any number that is not in use between 0-99. Run the following command to print out which ports are currently in use: ls /dev/rfcomm*

In this case, you will see it displayed as "/dev/rfcomm[port #]"

Command Line
This should work for most major Debian/Ubuntu-based distros. This is performed in a clean installation of Linux Mint, which is based on (but better than) Ubuntu. Ubuntu is based on Debian and shares many commonalities.
Start by entering the bluetoothctl terminal by opening a terminal and typing
bluetoothectl
Once entered, you will start a scan of nearby devices by running:
scan on

Allow the scan to run for a few seconds. A number of devices will be detected. After a few seconds, run scan off to stop scanning.
To show devices that were found, run devices
Find the "SSSMCK", select and copy the devices BT address (in this case 98:DA:50:00:BF:05). You will need this address for a few further steps. Paste it into an empty document if you need to.

Now we will trust and pair the device so that we do not need to enter the PIN code each time. Do this by running trust [BT address]
Then we will pair the device by running pair [BT address]
At this point you will be asked for the PIN. By default this is 1234.

If Buoy does not recognize the device you may need to create a com port. We do this by using the rfcomm application. It may or may not be installed on your system.
Run sudo rfcomm connect [device #] [BT address]
In this example we assign it to #5 -- you will want to use any available rfcomm devices. This is likely any number between 0-99 unless you have previously assigned ports. You can view which ports are in use by running ls /dev/rfcomm*. Any devices that are returned are currently in-use and cannot be assigned.

We can make this connection permanent by running sudo rfcomm bind [device #] [BT address] and it will automatically connect and bind when detected.
We can now see the device listed in Buoy.

Troubleshooting
If you are getting this error when trying to connect:

It means that you do not have appropriate permissions to open the port. You can either run the app as root sudo ./Buoy.sh or you can fix this by continuing to read below:
First, we want to see what group the device is being assigned. By default this should be either the "tty" group or the "dialout" group. However, if you have very strict security settings, your computer may assign this device to the group "root". In this case, you will only be able to access the device if you belong to the root group. We can find out what group the device is assigned by running ls -al /dev/ttyUSB* (or whatever device identified your SSSMCK is being assigned, this can by ttyACM or similar).
![]()
We can see here that the device is being assigned to the "root" group. We need to fix this. First we need to find out what groups our user belongs to. Do this by running groups
Then we need to find out which groups are available by running cat /etc/group.

Here we see that the group "tty" is available. This is the best choice to use. If it is not available, you can use the group "dialout" instead. Since this user does not belong to this group, we need to add this user to the group. Do this by running sudo usermod -a -G tty [your username]

Finally we need to modify the rules file that assigns the SSSMCK to a group. Do this by running sudo [your favorite text editor] /lib/udev/60-serial.rules. In this case we will edit the file with "nano", but you can use vim or xed or whatever you have installed.
![]()
We will look for a line that starts with SUBSYSTEMS=="usb and append the following text: , GROUP="tty". Please note that the COMMA is VERY IMPORTANT! Now save the file (with nano use "Ctrl + x" and then confirm the save).

Now the next time that we connect to the SSSMCK we will see that it has been assigned to the "tty" group:
