SSSICK/Installation
Prerequisites
Tools
- Flat-head screwdriver
- Any other applicable tools to remove and install your particular intake system
- Soldering iron (may be necessary)
- Wire stripper (may be necessary)
- Terminal crimper (may be necessary)
A few tools are marked as "may be necessary". This depends on if you are wiring your own pigtail or if you are wiring power in a specific way. Many people will require nothing more than a flat-head screwdriver and the other tools necessary to remove the original VAM (usually a 10mm socket and flat-head is all that's needed).
Hardware
Determining which version of the kit you have is necessary before following wiring guides or otherwise. There are 17 total released versions. Some of the more popular versions are:

R017
R018

R019
R020
R021
R022


Installation
- Remove the 10mm nuts holding the intake filter box in-place (there will be 2-4 depending on model, engine, and production date).
- Loosen the VAM-to-intake elbow hose clamp. Disconnect the VAM from the chassis harness. Remove the VAM and filter box.
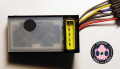
- Find the VAM harness connection. Pull back the rubber weather protection to expose the harness connection and wires. Feed the supplied 12v supply wire through the large opening toward the small opening. It may help to use a screwdriver or wire-feeder to help the wire through the tighter end of the rubber protector (see fig. 1).
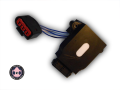
- The terminal will simply snap right into the 5th, empty slot of the stock VAM adapter (see fig. 2). The stock VAM does not make a connection with this, so you can switch back to the stock VAM if necessary without any modification to your wiring.
- Install your selected MAF in place of the original VAM. You may need to use adapters or a different intake boot depending on the MAF diameter.
- Install your new filter-side intake components.
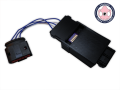
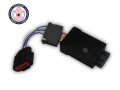
- Run the new power supply wire either to a switched battery source, or replace a fuse with the vampire fuse adapter (the top slot is the fuse for the MCK, while the bottom slot is for the original fuse). Make sure the fuse direction is correct! (see fig. 3, 4, & 5)
- On an M20, good fuses to tap would be 12, 21, or 28.
- If not pre-wired, you may need to splice a MAF pigtail to the included universal 5-pin connector. See the wiring section below for pinouts.
- The SSSMCK installation is now complete! Your unit will have been pre-programmed to convert between the two intake sensors you specified on your order, but you can always use BUOY to retune the SSSMCK to a different sensor combination.
- (Optional, but recommended): If you have a wideband EGO (O2) sensor with gauge, fine sensor adjustments can be made. Disconnect any ECU EGO feedback and perform an ECU reset. Start your vehicle and allow it to reach normal operating temperature. Depending on your version, you may either use the manual mechanical adjustment on the SSSMCK, or you may use BUOY to set a correction value through bluetooth. R019-01 through R019-06 are setup by default to use the manual mechanical adjustment on the PCB, but can be flashed to use BUOY-controlled adjustments. R019-07 and newer will use BUOY exclusively for airflow corrections.


Configuring the IAT Sensor
ONLY APPLICABLE FOR R019 AND OLDER HARDWARE. R020 AND NEWER HAVE SOFTWARE CONTROLLED IAT
- Not all MAFs contain IAT sensors, please consult your specific MAF specifications.
- Not all IAT sensors operate with the same specifications as is expected by the stock ECU. Check first, otherwise either be tuned for the specific IAT sensor you will use, or use the internal temp sensor of the SSSMCK.
- If you are using an external IAT sensor, connect the IAT wire from the 5-pin connector to the signal of the IAT sensor, and the other wire of the IAT sensor to ground. Use ONLY 2-wire IAT sensors! But also please keep in-mind that the GM 2-wire IAT is not interchangeable with stock BMW and will require a specific tune.
- If there is any doubt, it is best practice to use the built-in temp sensor within the SSSMCK. It is setup to work with M20, M30, M40, M42, and S14 engines. You can choose between internal and external temp sensors using the switch or jumper as outlined in figure 5. Move the switch or jumper location to “INT” for internal sensor, or “EXT” for external sensor.

Fuse Choice
A fuse of no less than 2A and no more than 10A should be used. The unit should draw between 0.25 to 1.00 amp (depending on intake sensor used).
On hardware version R01901 and newer the unit has an internal resettable fuse, so the external power-line blade fuse is not as import as earlier versions, but the same rating (between 2-10 amp) should still be used. A resettable fuse will almost never need replacing as it does not "blow" but instead automatically breaks linkage at a certain point, and over time will reconnect itself once the current and temperature reduces to safe levels.
Wiring
As of hardware R020 there is no longer any need to wire a connection unless you have specifically purchased a universal "wire-it-yourself" adapter module. The modules -- from MAF to MAP -- simply plug straight into the SSSMCK base. This means that there is no wiring necessary between the MAF/MAP/TPS and the SSSMCK!
| Color | Function |
|---|---|
| RED | 5V |
| BLACK | GROUND |
| GREEN | 12V |
| BLUE | MAF SIGNAL |
| YELLOW | TEMPERATURE SENSOR |
| Color | Function |
|---|---|
| RED | 5V |
| BLACK | GROUND |
| GREY | 12V |
| BLUE | TEMPERATURE SENSOR |
| YELLOW | MAF SIGNAL |
| Color | Function |
|---|---|
| RED | 12V |
| BLACK | GROUND |
| GREY | 5V |
| BLUE | MAF SIGNAL |
| YELLOW | TEMPERATURE SENSOR |
Adjustments and Tuning
See the BUOY page for how to use the SSSMCK logging and tuning software.
Logging
See the BUOY page for how to use the SSSMCK logging and tuning software.
FAQ
- Do I have to make any other engine or ECU modifications for this item?
- No, there are no required engine or ECU modifications for most every vehicle when using a MAF sensor.
- HOWEVER, when using the TPS or MAP adapter, you will NEED a specific tune to make them work properly.
- Should I reset my ECU?
- It is a good idea to reset your ECU after installation. There are instructions on how to do this on our website.
- Which MAFs can I use?
- You will have specified a MAF during checkout. The unit will be shipped with that MAF pre-programmed. However, you can change MAFs and simply reflash the SSSMCK to the new MAF!
- Can I change MAFs in the future?
- Yes! This is designed to be user-tunable, so you can use the freely available software to flash to a different MAF.